I've been following the craziness of Ludem Dare for a while, and kept hoping some of my free time would line up with one. Well, it just so happened that last weekend there was a 48 hour mini-jam that coincided with a relatively calm weekend. I decided to jump in and see about cranking out a game. Due to some amazing weather I ended up spending about half the weekend outside doing yard work, and worked on this game when I needed a break from the weeds.
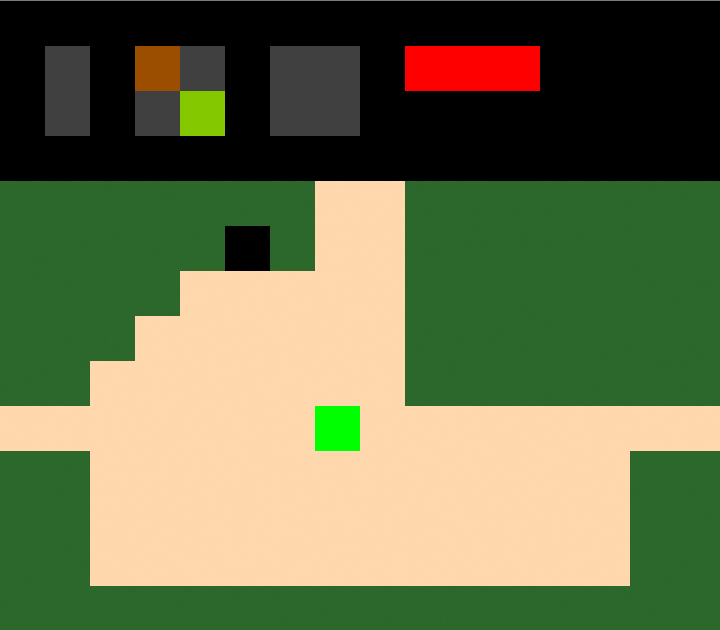
The theme of the jam was "de-makes" which meant all the participants were invited to re-make a game of their choosing in a low-fidelity, low-tech or otherwise deconstructed format. After kicking the idea around in my head for a while, I decided to de-make the original Legend of Zelda. My de-make would be to rebuild the game, but with a viewport of just 16 x 16 pixels. No interpolation, no cheating, just 16 x 16 blocks of one color each.
To figure out if this crazy idea even made sense, I did some tests in photoshop to make sure the various pages of the world map would fit into the 16 x 16 limit. Fortunately the Zelda map screens are all a tile grid of 16 x 10 tiles. This fits nicely into my limit with a few pixels to spare for the status area at the top. The final content actually fits into a 16 x 14 pixel rectangle, so I beat my limit by 32 pixels!
Next I set about writing code. Right off the bat I decided to write the game for the web, using JavaScript and rendering to a 2d canvas. In addition to the insanely small canvas, I decided to impose another arbitrary constraint, I wouldn't use any libraries. All the code had to be written from scratch in the 48 hour window.
Workflow Over the 48 Hours
Over the two days of work, I built the game from the map forward. What I mean is that my first goal was to get individual map pages rendering on screen. From there I moved on to the game manager component, building out the startup logic and render loop. This lead to the entity system, which in turn lead to the player entity. Once I had the player moving around I built code to check for collisions with obstacles in the map and changing the view when the player hits the edges of the screen. At this point you could explore the whole world map! It was pretty boring though.
Next I started making monsters and items for the player to interact with. Since I had common code to check for collisions, get lists of entities occupying particular squares, etc, the monsters weren't terribly difficult to implement. The most time consuming part was getting the combat mechanics to a good place where it was challenging but not frustrating.
As I built out the game logic, I tried to keep general purpose functionality at the higher levels of the game architecture. This meant things moved a little slower at first, but towards the end I could add items and new monsters with very little effort. Even though I didn't have time to add more than two types of monster, the engine and architecture would make it trivial to re-create all of the various enemies found in the original game.
One of the last things I added was the cave system. It's based on the idea that there is a one-cave-per-screen limit. So, I just check if the player walks onto a black pixel, and if so I store some state and whisk them off to a special cave screen. When they leave the cave the pre-cave state is restored. Upon entering certain caves I have to check some global game state (does Link already have the sword? etc) but it turned out to be a pretty simple system and was easy to expand once I had it in place.
Architecture
You can check most of this out just by poking around in the chrome debugger. I didn't minify the source and the various components are split into separate files. Additionally, the game can be modified at run time via the console quite easily. For instance, you can trigger all sorts of game logic in the console with a few simple commands:
game.map.gotoScreen(2, 2);
game.link.getItem('sword-1');
game.addEntity( new game.enemy.Octorok(3, 3) );
Game Manager
The game manager runs the show. It is an object instantiated at load time and stores references to all resources and functionality needed throughout the game. The game manager is also responsible for the per-frame update loop, and managing the entity life cycles. The game manager provides methods to add entities, to get the list of entities occupying a given location, and will automatically remove any entities that return false from their isAlive method.
Entities
Entities represent all actors in the game world. These include the player, monsters, items, weapons, and projectiles. Entities are all have at least three methods, tick, isAlive, and render. These methods are invoked by the game manager and can be implemented on a per-entity basis to provide a wide array of behavior. The player is also an entity, but is special in the sense that the game manager stores a named reference so other game logic can access the player state as needed.
Map Management and Rendering
The map manager loads the map data (which is all stored in a single PNG) and handles the display and state management for the world map. This includes adding entities to map screens, and checking to see what kind of cave should be loaded when the player enters a cave, etc.
Sounds
There is a class to load, and play back sounds. This means I can reference sounds by name elsewhere in the code and the sound manager will take care of the rest.
Input
Input is abstracted by an input manager class. This allows for hiding the raw keyboard input events from the rest of the game logic, and allows for useful pseudo events like notification when a key has just been pressed vs being held down.
Graphics
Silly as this may seem, I abstracted the rendering logic in a simple graphics class. This class provides two methods, one to set a single pixel, and one to draw a filled rectangular region of pixels. By isolating all of the drawing logic, I later was able to add a buffering scheme that removed all redundant draw calls to the canvas, meaning the browser would only have to redraw content when changes occurred in the view. Even though I wasn't pushing performance limits for any modern browser, it's still nice to see as little drawing occur as possible.
Game Data
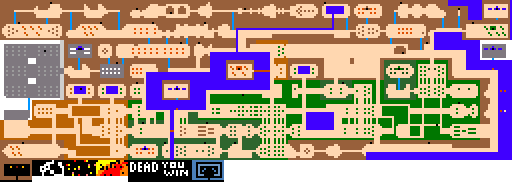
I'm stealing this technique from Notch, but early on I decided that the map would contain as much game data as possible. Except for a few magic default values and some constraints, the entire game is built around the map image, seen here:
The biggest benefit I found for this technique was that I could tweak the placement of things using photoshop rather than having to hunt down data in a text editor. Screen too cramped for monsters? Just turn them off on that screen and re-save the image. Don't want a cave on this screen? Just erase the black pixel.
Meta Screens
The map looks pretty much like the zelda overworld, however you might notice the extra bits in the lower left. I created an extra row of "screens" to store what would have otherwise either been hard-coded in the game logic or some cumbersome JSON blob. The world is made up of a 16 x 8 screens, this meant I could use pixel values to represent data about each screen, and that pixel data would fit into one page worth of pixels. They are like mini-maps of the world where each pixel corresponds to a game screen. These extra meta-screens represent various game data which is all loaded when the map is initialized.
Meta-Screen 1 - Default Cave
The first meta-screen isn't data about the game world, but is the default cave screen.
This cave is populated based on subsequent meta-screen data to either contain a sword, a store, or a container heart.
Meta-Screen 2 - Zora
The second meta-screen contains a white pixel if zora is on that screen (the water monster that shoots fire balls at you). At first I was just going to put zora on any screen with a water tile, but that's not now it works in the original game!
Meta-Screen 3 - Cave Types
The third meta-screen uses pixel color to designate the type of cave (if a cave exists). Types are either a triforce, container heart, or sword. If none is specified, the cave will be a store selling a bomb or heart.
Meta-Screen 4 - Monsters
The fourth screen indicates if monsters should be present on the screen, and if so, what the balance of weak to tough monsters should be (red is all weak, orange is a 50/50 mix, yellow is all tough).
Meta-Screens 5 and 6 - Game End Screens
To save time, rather than coding special logic to handle ending the game, the end screens are literally map screens that show the game over or winning text, and the player entity is removed in those cases, essentially removing any user input.
Meta-Screen 7 - Triforce Cave
In an attempt to make the triforce caves more exciting and set them apart from other caves, I created a meta-screen for them. This was something of an afterthought so it's the last screen in the bunch.
Always be testing
If I had any advise for someone working on a game jam, it would be to test the game as often as humanly possible. When time is at a premium, you have to be building functionality at the same time as you're tuning the game play. The lo-fi combat is nothing to brag about, but I must have tweaked the various delays and timing values for the sword and damage mechanics a hundred times over the weekend, fiddling with things every time I did a test run. Beyond just getting things working, you're trying to make a fun game and much of that task comes down to how the game feels, not just checking features off a list.
